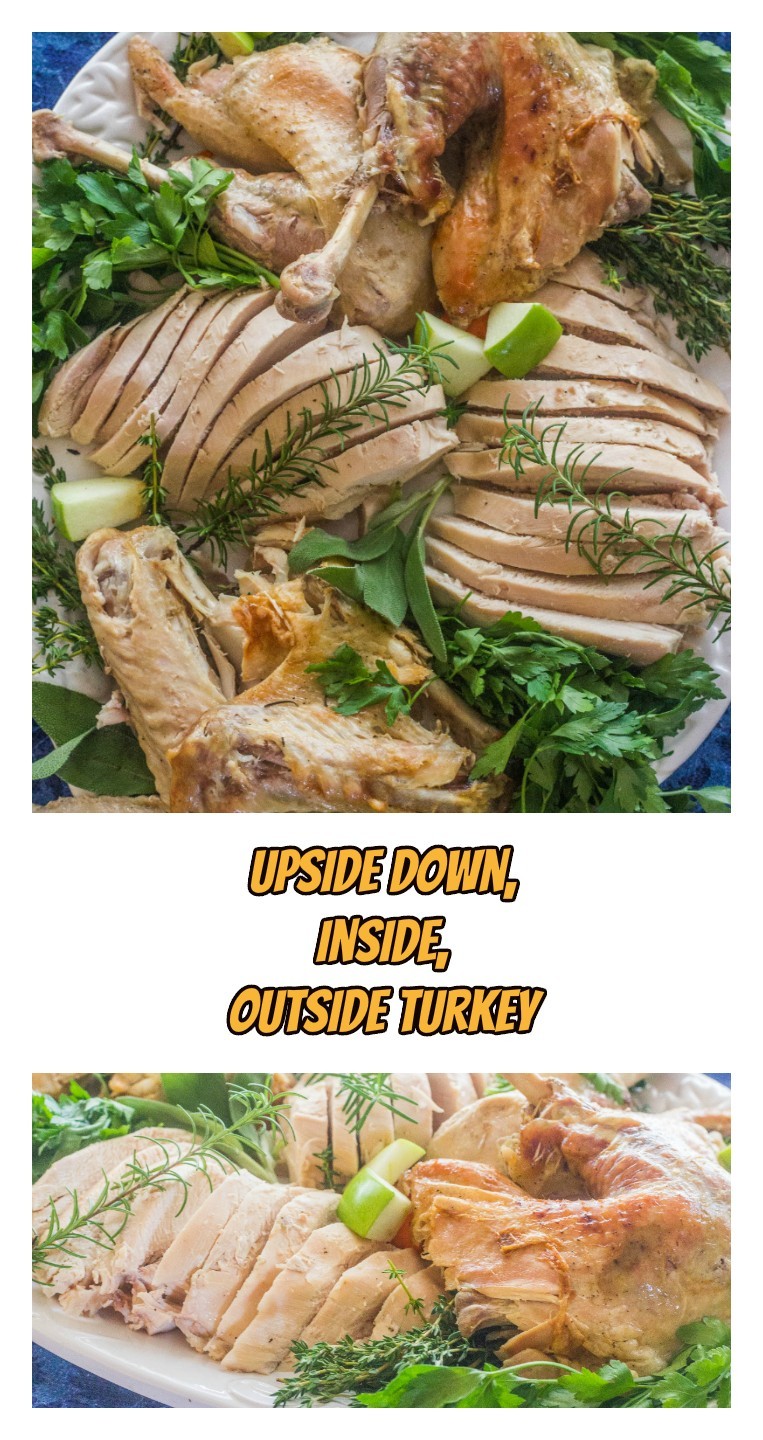
Upside Down, Inside, Outside Turkey. For turkey that’s always moist, use this fool-proof method. The white meat is just as juicy as the dark meat.
Countless numbers of turkeys have been sacrificed for a grand feast only to wind up so dry you can’t even swallow the meat. Some people have been eating, or attempting to eat, dry turkey all their born days with no idea that turkey can be moist and succulent. Use my method for Upside Down, Inside, Outside Turkey and dry turkey will never plague you again.
Growing up, ham or chicken was typically the star of holiday celebrations. I never knew my grandmother to cook a turkey. My mother took a notion to cook turkey one fateful Thanksgiving. I don’t remember anything notable about that particular turkey with the exception of one thing. One big thing. Someone had convinced my mother to try what they promoted as their no-fail method for cooking a turkey. I don’t remember the specifics of how the method was supposed to work. Apparently, Mama didn’t either. The method relied on cooking from residual heat. You put the turkey in the oven in a covered roasting pan the night before at a high temperature and after a short while, the oven was turned off and the oven door was to remain closed until the next morning. I’m not sure where the foul-up occurred, but something went badly wrong. To say the turkey was dry is like saying Lady Gaga isn’t modest. It was so dry I don’t think we have a word in the English language to describe it. Poor Mama! I remember feeling so bad for her. We all have kitchen failure. I’ve certainly had my share, too.

One fateful day, several decades years ago, I was having a conversation with my boss’s mother about Thanksgiving Dinner. During the course of the conversation, I mentioned that I haven’t found a good way to roast a whole turkey that wouldn’t result in dry turkey. She told me she cooked her upside down in an oven bag and it’s always moist and juicy. She went on to explain the reasoning for cooking it breast down is the juices will flow down to the breast meat and keep it from drying out. That made perfect sense to me. Use the laws of nature to help the turkey out. As the years progressed, I modified the recipe by adding fruits, vegetables and fresh herbs and coating the bird with olive oil. The result is a splendid turkey that is so moist it’s unbelievable. The fresh fruits, vegetables and herbs not only flavor the bird, flavor the broth that forms as a result of the cooking process.
I wanted to test the reliability of this method that I had been using for so many years. Last Thanksgiving, I veered from my trusted method to test out a different process. I brined the bird for 24 hours which was a pain in the hind side. My hind side, not the bird’s. My turkey was so big, the only container I could find big enough to hold the turkey and brine solution was a cooler. I had to keep checking to make sure the solution was staying cold enough which meant adding ice occasionally. After the brining process, I made up a compound butter and smeared the butter under the skin and all over the outside of the Mr. Tom Turkey. While he was cooking, I basted him frequently. The whole dadgum process was time-consuming and not carefree.

The consensus from my family was, “Can we go back to cooking the bird the way you normally cook it?”
Now, that was a scientific experiment as far as I’m concerned. The conclusion was proof positive that my old method is the best. I love science.
Now, let’s get down to business and stop the bantering. Simply stated, this process involves bathing a turkey in olive oil on the outside, generously seasoning inside and outside, adding fruits, veggies and herbs inside the cavity, placing the bird on a nest of fruits, veggies and herbs outside the bird and cooking inside an oven bag upside down. That’s it! No brining. No basting. No worries. No kidding! Who knew that all those spatial concepts you learned in kindergarten would help you cook.
The downside to this cooking method is that you won’t have crispy skin like the turkey in the Normal Rockwell picture. Truth be told, that turkey was probably dry as a bone. The turkey that I referenced from last year had beautiful, brown crispy skin but the meat wasn’t nearly as flavorful and juicy as it is with this method. In a perfect world, we should have both. I can get both in roasted chicken, but the extra cook time required for turkey creates a challenge with conventional cooking methods that tend to dry out lean meat with prolonged cook time required to reach the correct internal temperature.
If you’re more inclined to cook turkey outdoors, and if crispy skin is of ultimate importance to you, Deep Fried Turkey Recipe is something you should check out. The article is comprehensive and includes all the information you need, including the all-important safety tips, that you need for a golden brown turkey.
If you like to entertain folks by carving the turkey at the table, this isn’t the method for you, either. It comes out so tender that the breast literally falls off the bone. The legs and thighs separate from the carcass with a gentle tug. All you need to do is slice the breast.
I have a stockpot ready and my husband throws in the carcass and skin as he’s getting the bird ready for a platter. All that gets covered with water and I start making turkey stock for dressing, gumbo, pot pies, etc.
Turkey time is a wonderful time of the year.
Y’all come see us!

Upside Down, Inside, Outside Turkey
Season turkey on the outside, stuff inside with fresh produce and herbs, cook upside in a baking bag. A fool proof way to produce juicy, tender turkey every time.
1 whole turkey (You pick the size. I’ve cooked everything from 12 pounds to 22 pounds)
olive oil
2 apples (I used Granny Smith’s)
3 stalks of celery
2 carrots
2 medium sweet onions
1 head of garlic
1 lemon
several sprigs of parsley
several sprigs of sage
Remove giblet bag, neck and pop-up thermometer. Wash and pat dry turkey. Give him a good rub down with olive oil. Season generously with 4-1-1. Don’t forget the cavity.
 Here’s the cast of characters for inside and outside: apples, celery, carrots, garlic, onion, lemon, parsley and sage.

Don’t even worry about peeling, trimming or coring. Just wash everybody good. Cut everything into three or four pieces except garlic. Cut the top off the garlic bulb.

If you want to make giblet gravy, reserve a piece of everything to make the stock for the gravy.

Put roughly 2/3 of the fruits and vegetables and some of the herbs in the bottom of the oven bag. I used Reynolds Oven Bags Turkey Size.

Stuff the inside the cavity with the as many of the fruits, veggies and herbs that you can cram into it. Truss the legs. This turkey was a Publix brand and it came with a plastic thing-a-ma-jig attached to it that is so much easier to work with than cord.

Turn the bird upside down and place in the oven bag. Sprinkle some parsley and sage leaves on top.

Tie up the bag and place several slits in the top. Cook according to the directions that come with the oven bag. This was a 13 pound turkey that I cooked at 350 for 2 1/2 hours. Follow the recommended cook times from the oven bag manufacturer. Remove from oven and let it sit in the bag for 30 minutes.
Enjoy your juicy turkey! I’ve taught many people how to cook a turkey this way. They tell me this will be the way they cook turkeys from now on.

Upside Down, Inside, Outside Turkey
Ingredients
- 1 whole turkey You pick the size. I've cooked everything from 12 pounds to 22 pounds
- olive oil
- 4-1-1 seasoning
- 2 apples I used Granny Smith's
- 3 stalks of celery
- 2 carrots
- 2 medium sweet onions
- 1 head of garlic
- 1 lemon
- several sprigs of parsley
- several sprigs of sage
Instructions
- Remove giblet bag, neck and pop-up thermometer. Wash and pat dry turkey. Give him a good rub down with olive oil. Season generously with 4-1-1. Don't forget the cavity.
- Here's the cast of characters for inside and outside: apples, celery, carrots, garlic, onion, lemon, parsley and sage.
- Don't even worry about peeling, trimming or coring. Just wash everybody good. Cut everything into three or four pieces except garlic. Cut the top off the garlic bulb.
- If you want to make giblet gravy, reserve a piece of everything to make the stock for the gravy.
- Put roughly 2/3 of the fruits and vegetables and some of the herbs in the bottom of the oven bag. I used Reynolds Oven Bags Turkey Size.
- Stuff the inside the cavity with the as many of the fruits, veggies and herbs that you can cram into it. Truss the legs. This turkey was a Publix brand and it came with a plastic thing-a-ma-jig attached to it that is so much easier to work with than cord.
- Turn the bird upside down and place in the oven bag. Sprinkle some parsley and sage leaves on top.
- Tie up the bag and place several slits in the top. Cook according to the directions that come with the oven bag. This was a 13 pound turkey that I cooked at 350 for 2 1/2 hours. Follow the recommended cook times from the oven bag manufacturer. Remove from oven and let it sit in the bag for 30 minutes.
- Enjoy your juicy turkey! I've taught many people how to cook a turkey this way. They tell me this will be the way they cook turkeys from now on.


sherrie dollar says
this may seem foolish, but what in the world is 4-1-1. i assume it’s four parts something to one part salt and one part pepper? not sure what the other something is.
so i LOVE to bake and kitchen tinker, but i don’t do poultry, skin or bones of anything very well. i buy the boneless, skinless chicken and usually can’t eat it after i handle it. just grosses me out! so my son’s kindergarten yr they had a thanksgiving feast. i got the call to bring something and baking the turkey was an option. a local store was donating the turkey so i assumed i had the easy way out. i thawed it in the fridge and was really excited about my first turkey baking adventure. i knew there should be inards that needed to come out. i didn’t realize there were openings on both ends. i dug around inside that bird and came out empty handed. i attempted spraying water in there to make it fall out. (realizing now that there were opening in both ends.) finally i had my 5 yr old shine a flashlight inside the cavity while i continued to dig. this particular tom had the pop up timer to tell me when he was ready. i was very thankful bc i decided if i couldn’t gut it at least maybe i could bake it right. i finally gave up and decided this turkey was gutless and put him in the oven. i thought it should take about 3 hrs to bake. after 4 hrs the popper hadn’t popped. 5 hrs, 6hrs and no popper. i was ready to give up and go to bed so that’s what i did. i decided i dislodged the timer when i was digging around in there. it looked really pretty, but i didn’t want to mess it up to taste it. my son said it was so good, but i nvr heard from the teacher. i’ve nvr attempted another one, but now i just may! oh yeah, for Christmas the teacher asked me to bring napkins. 🙂
Jackie Garvin says
Sherrie,
I just about fell out of my chair laughing at your story!! That is a funny, funny story! Thank you so much for sharing that with me! 🙂
I had a link to my 4-1-1 recipe. Maybe you couldn’t see it. It’s 4 parts kosher salt to 1 part ground black pepper to 1 part garlic powder ( not garlic salt). This is my all-purpose seasoning that I keep on my workspace and use all the time.
You really can’t mess up a turkey using this method. I promise! 🙂
I hope you have a joyous and happy Thanksgiving! <3
Jean says
What I remember of my mother’s adventures in turkey cooking was the turkey was never brown…and didn’t really have much taste. My Grandmother Evans cooked her turkey in one of those appliances that you can still buy. I think I will try your method….it looks really good. I have never put a whole turkey in brine but have done a turkey breast which turned out great but it was small enough you could put it in the fridge. A whole turkey would be a another problem. If you hear someone knocking on your door next Thursday……….
Jackie Garvin says
Jean,
My method is good but, like I stated in the post, you don’t get crispy brown skin. But the meat is so juicy and tender! 🙂
Jean says
Its hard to get a turkey to look like the pictures all show if its not cooked to death.
You could brush something on it that would brown it if you present it to the table without being carved first. We used to carve slices and lay they around the platter.
I love turkey!
Jackie Garvin says
Jean,
I coat it in olive oil. Since it’s cooked breast side down, all the skin on the breast sort of steams instead of roasts. You really have to pull the skin off before you serve the turkey. I love turkey, too!
amanda says
My mom has cooked her turkey like this for as long as i can remember, she even uses the exact fruits and veggies you mentioned! AMAZING! We are all sitting around now talking turkey and no one in the office actually believes that a turkey can be juicy and fall of the bone unless it’s deep fried. I beg to differ!
Jackie Garvin says
Don’t cave, Amanda! I’m not suggesting that deep fried turkey isn’t moist. However, it’s not anymore moist than this method. And, all those fruits and veggies add so much flavor to the bird. The drippings are like pure gold! 🙂
Emma Chapman says
I always use a brown in bag, but have not tried the upside down method, or all the veggies. Will definite use this method next time. Now, my question: All the directions for Reynolds Brown in Bags say use a spoon of flour. Do you not do this?
Jackie Garvin says
Emma,
Flour in the cooking bag is simply there to keep the meat from sticking. The bed of fruits and veggies serve the same purpose and they’re much more flavorful. 🙂
LesliM says
I’m not sure I understand your answer. Flour keeps he meat from cooking? Isn’t that the goal, cooking the meat?!
Jackie Garvin says
LesliM,
Of course you don’t understand my answer because it doesn’t make sense. lol! Instead if cooking I meant to say sticking. Flour keeps the meat from sticking. Happy Thanksgiving!
Agnes Steen says
Could you use this method using a Turkey breast ?
Jackie Garvin says
Agnes,
You can. Of course the cooking time will vary.
Jeanie Presnall says
My Mother always cooked hers upside down in a brown paper bag tied shut with a string on 250 all night. It came out brown & juicy. If she had an apple she would put it in the cavity. If not an onion. It became a problem when stores went to plastic. I cook mine that way but try to find brown paper bags all year. All she did was salt it & smear Crisco all over it.
Jackie Garvin says
I’ve never tried the brown paper bag method. Sounds interesting!
John Pauli says
I’ve been doing my turkeys that way for at least 10 years. The only thing I add, is about a 1/2 a bottle of dark beer, to the cavity. The past couple of years, I’ve been using a pumpkin beer. It adds a sweetness to the meat and of course, so much needed moister. Also, jacks up the flavor of the gravy. And of course, the other half of the bottle, is for the chef! 😉
Jackie Garvin says
What a great idea!
Sherry Poole says
I have been cooking my turkeys-chicken like this for years… I am in my 60’s and can remember my mother doing it… You will not be disappointed in the outcome… I have been married 3 times and my 2 husband (deceased) made fun of me because it did not “look good” but was told later not to change a thing.. my now husband did the same thing and I am still cooking them like this… I was told that you can turn it over and open the bag and put it under the broider but I have not done it…
Jackie Garvin says
Sherry,
I haven’t tried to brown the turkey either. The meat is so succulent and moist and that’s what matters most to us. We’re not messing with it.
Happy Thanksgiving!
Cindy says
I don’t know which is better the recipe or the directions. Yes roasting a moist turkey is challenging at best. My greatest challenge at thanksgiving is needing 8 ovens. I’m gonna try this for sure.
Jackie Garvin says
Cindy,
I have turned so many people on to this method. Once they try it, they never use another cooking method. I hope you like it just as much, too!
Sherry says
Do you place turkey on a rack or just on the vegetable bed?
Jackie Garvin says
Sherry,
On the vegetable bed inside the brown n bag.
TexasTyggie says
I wonder if I could do this in a roaster oven like a Nesco, or if it would have to be in the real oven.
Jackie Garvin says
I’m not familiar with the type of oven you mentioned. However, if it heats like a regular oven and is big enough that the bag won’t touch the elements, I see no reason it wouldn’t work.
Angie says
Is there a benefit of using olive pil over butter? Have only ever used butter. Thanks!
Jackie Garvin says
Hi Angie,
I responded to your email before I saw your comment here. If you’re accustomed to using butter, then it should be okay for this cooking method. I use olive oil because it has a higher smoking point and doesn’t burn as quickly as butter.
leslie says
Hi Jackie,
I was wondering how you carve this turkey. I made turkey like this last year and tried to flip it to carve and, boy oh boy, did I make a mess! So do you just leave it upside down…how do you get to the breast?? Thank you for your great recipes and detailed information!! Have a great day!!
Jackie Garvin says
Hi Leslie,
The turkey is so tender and juicy that the legs and wings come apart on their own. We remove those before flipping the turkey over. Then, remove the whole breast and slice it crosswise on a cutting board. I hope this works for you. Thank you for your kind words. Happy Thanksgiving!
Sue says
How does it work to make gravy? Suppose you strain the juices from the veggies/fruit on the bottom of the bag? Any tips to make gravy from this bird?
Jackie Garvin says
That’s one way to do it. I always make Giblet Gravy.
Here’s the link for my recipe: https://syrupandbiscuits.com/giblet-gravy/
Sheryll says
When using a turkey breast in this recipe, you don’t have the rest of the turkey and it’s fat to moisten the breast. Do you do something special to provide the moisture to the breast? I’ve typically used the baking bag but always put the breast up and then had drier turkey, though it was moister than baking without the bag. Thanks for the recipe!
Jackie Garvin says
Sheryll,
My preferred cooking method for a turkey breast is a slow cooker. I think you get a consistently juicy bird which I’ve not been able to replicate with other methods cooking only the breast. Check my recipe: https://syrupandbiscuits.com/slow-cooker-turkey-breast-gravy/
Charlie says
I’ve been doing turkeys breast-side down in oven bags for a long time, but in the microwave. Since our new house has a smaller microwave, I was excited to find your recipe. So I tried it in the oven, using your recipe with the fruits & veggies this year. My only problem was that the breast was not up to temp when the thigh was, and didn’t seem to want to move up. I waited but as the thigh got to 165° I thought if I took it and for resting it might get there. It never did, though, and I had people waiting on dinner! So I took the breasts off and microwaved them (covered). At dinner the dark meat was delicious and juicy, but the breasts ended up dry (after the microwaving). I’m wondering why the breasts didn’t get fully cooked. Could it have been the fact it was soaking in juices after the veggies and fruits cook down? All my birds done breast down in bags in the microwave have been moist throughout. Thoughts?
Jackie Garvin says
Charlie, I don’t understand this at all. Breast cook faster than dark meat so it should certainly be done before the thighs reach 165°. I’ve cooked numerous turkeys, of all sizes, with this method and have turned on countless numbers of people to this cooking method. All have achieved a wonderful outcome. I’m sorry you didn’t have a good experience.