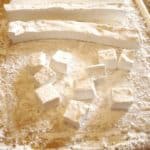
Homemade Vanilla Marshmallows
Ingredients
- Homemade Vanilla Marshmallows
- The process for making marshmallows is easy but does require specific equipment. The first is a candy thermometer. The syrup solution must reach a certain temperature in order for the marshmallows to set. Secondly I don't know that a hand mixer, or your arms, would hold up long to whip the hot mixture to the right consistency and temperature. A stand mixer is surely necessary.
- 3 packages unflavored gelatin
- 1 cup ice water divided
- 1 1/2 cups granulated sugar
- 1 cup light corn syrup I used Karo
- 1/4 teaspoon kosher salt
- 1 teaspoon vanilla extract
- 1/4 cup powdered sugar
- 1/4 cup cornstarch
Instructions
- Place gelatin and 1/2 cup water in the bowl of a stand mixer.
- Mix powdered sugar and cornstarch in a small bowl. Prepare a 9 x 13 pan by spraying with a non-stick spray. Coat the pan completely with the sugar/cornstarch mixture. Keep the non-stick spray and sugar/cornstarch handy. We'll be using both of these again.
- In a medium saucepan combine 1/2 cup water, granulated sugar, corn syrup and salt. Make sure you have at least a medium size saucepan. The mixture will bubble up as it boils. You don't want it to be more than 1/3 full before you start cooking.
- Place on medium high heat covered for 4 minutes. Uncover and cook until the syrup reaches 240 degrees which usually takes me 7 or 8 minutes. Today, it took 9 minutes. There's no need to stir while it's boiling. Remove from heat as soon as the correct temperature is reached.
- Attach the whisk attachment and turn mixer on low speed. Slowly pour the HOT sugar syrup in the gelatin and water mixture. This stuff will burn the fire out of you if it splatters on you. Be careful. Be very careful.
- After all the syrup has been added, turn mixer to high and let her go until the mixture is thick and lukewarm This will take somewhere between 12 and 15 minutes. The mixture needs to be the same consistency as....well.....marshmallow cream. You'll know it when you see it. Add vanilla during last minute of whipping.
- Using a spatula that has been sprayed with non-stick spray, pour the mixture into your prepared pan. Use your spatula or your fingertips (sprayed with non-stick spray) to pat the mixture in the pan evenly. No matter how hard you try, you will get marshmallow cream all over your hands and you will be sticking to things you never before thought possible. It's all part of marshmallow making. Just go with it.
- Sift sugar/cornstarch mixture all over the top of the marshmallows. Let it sit on your counter for at least 4 hours up to all night.
- After the marshmallows have "cured", turn them out onto a board that has been covered well with the sugar/cornstarch stuff. Don't be stingy with it, either. Remember, marshmallows are the glue that holds Rice Crispy cereal together enough that you can cut it into squares. Cornstarch will keep marshmallows from sticking to you and everything else in your kitchen.
- Keep all exposed marshmallow surfaces dusted with cornstarch/sugar. Cut strips that are one inch wide. Roll each strip in cornstarch/sugar that's on your board before you start trying to cut the strip into squares.
- Cut each strip into 1 inch squares. Roll each square in cornstarch/sugar.
- Store in an airtight container. If you're going to stack the marshmallows, sprinkle some cornstarch/sugar between each layer. This is especially helpful if you live in an area that has a high level of native humidity. Learn from my mistakes. I have tried leaving the cornstarch out and just dusting with powdered sugar. I still tear up just thinking about it.
- Enjoy your Homemade Vanilla (magical) Marshmallows!
Tried this recipe?Mention @syrupandbiscuits or tag #syrupandbiscuits!
